How to Clean Dust from Mobile Speaker Without Opening the Device (Full 2025 Tested Guide)
Hey, if your phone speaker starts sounding all muffled and low, take a deep breath—it’s probably fine. In almost all cases, the speaker isn’t broken. It just has a bunch of dust or lint stuck in its grills from being in your pocket or bag. It happens to everyone.
The good news? You don’t need to open your phone or visit a repair shop to fix it. Below, I’ll share safe, real-world tested methods to clean your mobile speaker without opening it — completely based on practical experience and what actually works in 2025.
Why Your Mobile Speaker Gets Dusty
Before cleaning, it’s important to understand how and why the speaker gets clogged — because that helps prevent future buildup.
- Pocket lint and micro dust sneak into the tiny speaker holes daily.
- Humidity or sweat can make the dust sticky, trapping more particles.
- Phone covers sometimes block or redirect dust into the speaker grill.
- Regular outdoor use (especially in places with high pollution or dust) accelerates buildup.
After a while, this gunk forms a thin layer over the speaker holes. This blocks the sound, making it quiet and muffled.
What You’ll Need (No Opening, No Tools Required)
Here’s your simple cleaning kit — everything safe and easy to find at home:
| To lift micro dust from the speaker holes | Purpose |
| Soft, dry toothbrush | To gently dislodge visible dust |
| Adhesive tape or sticky tack | For careful dry cleaning of edges |
| Compressed air (optional) | To blow out fine particles |
| Soft microfiber cloth | To wipe off loosened debris |
| Speaker cleaning sound tool / app | To vibrate out internal dust (like MySpeakerCleaner.com) |
| Cotton swab (optional) | Speaker cleaning sound tool/app |
Avoid: water, sharp objects (like needles or pins), or vacuum cleaners — they can damage the speaker membrane permanently.
Your Simple Guide to Cleaning Phone Dust — No Tools Needed!
Step 1: Power Off the Device
Let’s start with the most important step: power off your phone. It’s just a safety thing – better safe than sorry with any electrical surprises or loud noises!
Step 2: Inspect the Speaker Area
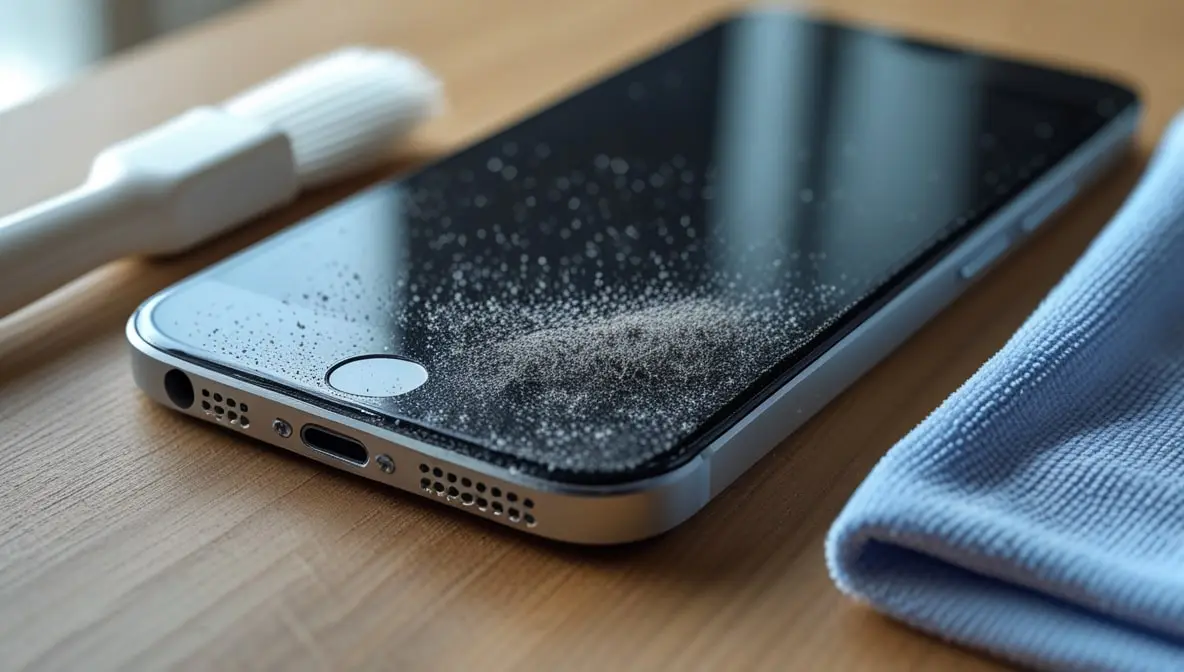
Let’s take a close look. Hold your phone under a bright light and peek at the speaker grills. See all that gunk? That’s the dust that’s messing with your sound.
If it looks really clogged up, don’t worry. You can still get it clean without ever having to open your phone.
Step 3: Dry Brushing
Try using a soft toothbrush or makeup brush. Gently brush across the speaker grills going one way – that way you’re sweeping the dust away rather than grinding it deeper.
Tip: Keep your phone facing down while you clean. That way, any dust you loosen will just fall out instead of going back inside.
Give it another good brush for about 15-30 seconds, then just blow gently over the speaker to clear away any loose dust.
Step 4: Sticky Dust Removal
Grab some sticky tape or a bit of sticky tack. Press it gently onto the speaker mesh and peel it off. It will lift out the tiny bits of lint stuck in the holes.
Don’t press too hard — just dab lightly. Repeat until the tape no longer collects visible dust.
This step works surprisingly well on phones like iPhones, Samsung, and Xiaomi models with fine mesh grills.
Step 5: Use a Speaker Cleaner Sound Tool (Audio Method)
Now for the internal dust — the stuff you can’t see.
Open a trusted Speaker Cleaning Sound Tool (like my-speakercleaner.com) — it plays a series of low- and high-frequency sounds designed to vibrate the speaker diaphragm and push out trapped particles.
How to use it:
- Set the volume to 80–90% (not max).
- Keep the phone speaker facing downward.
- Run the tool for 30–60 seconds.
- Repeat twice if needed.
You’ll notice small dust particles coming out — or an immediate improvement in sound clarity. This is a safe, modern trick used by technicians worldwide — no app install needed, works directly in the browser.
Step 6: Blow or Brush Again
After using the sound tool, lightly brush again or use compressed air (short bursts only) to clear out the loosened debris.
Hold the can about 15 cm (or 6 inches) away. Tilt it so you’re blowing across the holes, not straight into them.
Step 7: Wipe Clean
For the final clean-up, a dry microfiber cloth is your best bet for any leftover dust or stickiness. And hey, be careful with alcohol wipes—they’re great for metal, but they can mess up a plastic grill.
Step 8: Test Your Speaker
Now, play some music or a video and turn up the volume if it sounds clearer, great job! You fixed it yourself.
If it still sounds fuzzy, there might be deeper dirt or a little moisture inside. Try cleaning it one more time.
Bonus Tips: Keep Your Speaker Dust-Free Longer
- Use a dust-proof case that doesn’t block the grill but covers the bottom ports.
- Avoid keeping your phone face down on dusty tables or cloth surfaces.
- Clean weekly using a soft brush — prevention is easier than repair.
- Run the cleaning sound tool every 10–15 days to remove microdust.
- Never use needles, safety pins, or wet cloths — they do more harm than good.
- Avoid speaking on calls with wet or sweaty hands — moisture traps dust faster.
My Tested Cleaning Combo (2025 Version)
If you want the best, long-lasting result:
- Brush → 2. Tape → 3. my-speakercleaner.com → 4. Microfiber wipe repeat monthly, and you’ll never face muffled audio again.
- This simple combo is safe, free, and works on all phones — iPhone, Samsung, Redmi, Vivo, Oppo, Pixel — no need to open the device or visit a technician.
Final Thoughts
Here’s the good news — you really can clean your phone speaker without ever opening it up, and honestly, it’s the safest and smartest way to get your sound clear again. With just a few easy steps, a simple toothbrush, and a clever cleaning sound, you can clear out years of built-up dust in just a few minutes.
And the best part? A clean speaker means you’ll hear calls better, your music will sound fuller, and your phone will last you longer.
So next time your audio gets quiet or fuzzy, don’t panic and run to the repair shop. Give this simple DIY trick a try first. I think you’ll be seriously surprised by how well it works.